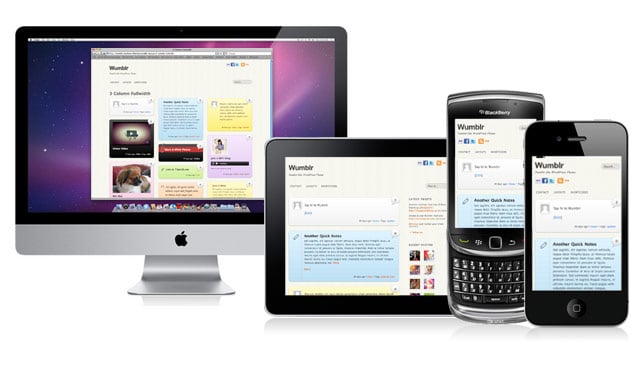
We are please to announce that Wumblr has been updated. We added new modules where you can set the default layout for: Archive (index, search, category, tag pages, etc.), all Pages, and all Posts. As a bonus, we also added a mobile version to it. Wumblr now has the same fluid layout feature as our popular responsive design themes: iTheme2, Minblr, and Funki. What is responsive design? Basically, the layout automatically flows (responds) base on the browser viewport. This means the layout will still look good and consistent when viewed from most modern devices (desktop or mobile) and any screen resolution. To see this in action, visit our demo, resize your browser window to see the fluid layout. Also, don't forget to try it on a mobile device such as iPad, iPhone, Android, and Blackberry.
This article explains the procedure on how to add new pre-built Themify Builder > Layouts.
Step 1: Create New Layouts
First create a new Post with Builder using the Builder Layouts demo (eg. title "Portfolio 2")
In Themify Custom Panel, make sure to select all these options: http://cl.ly/3W2w371J2t19 (NOTE: Featured Image will upload later when the layout is done)
Categorize the layout post accordingly
Change the post publish date very old so it won't appear in regular blog query top pages (eg. publish them as Feb 2011). The publish date should be organized batch by batch so we can track their release date (eg. Feb 2011 = one batch, Mar 2011 = another batch).
Design the layout and follow the design notes below:
Design Notes
When a Post or Slider module is used to display posts, remember to select "All Categories" instead of specific category (this way users won't see empty posts in their sites).
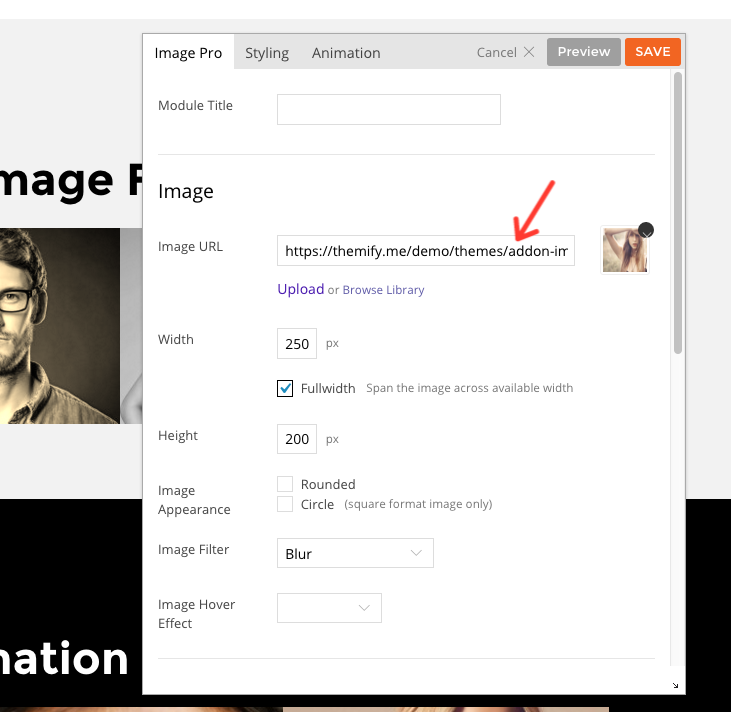
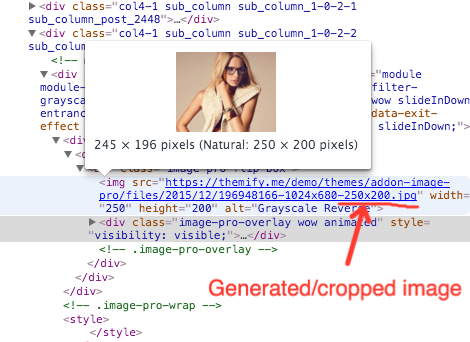
When images are used (could be post Featured Images, Image module, Slider images, etc.), remember to enter the desired image width and height so the img.php script will generate the exact image size. Then replace the image URL from the original image to the cropped image. See this sample post (all image URLs are using the cropped size).
When a video background is used, remember to upload the fallback background image because mobile doesn't support video background.
When using padding/margin, it is better to use % value as it is better for responsive.
The layout must look nice on all responsive breakpoints.
Step 2: Export Layouts
When layout is complete, test the layout: export the finished layout from the demo to your localhost and see how the layout looks like on your localhost. The layout on demo should look identical as your localhost.
If it passes the test, take a screenshot of layout (600x700px) and upload it as the post's Featured Image
Then use Themify Builder > Import/Export > Export the layout as a zip file (eg. portfolio-2.zip)
Download the WP generated thumb (150x174px) jpg file and name it as the layout thumbnail (eg. thumb-portfolio-2.jpg). To find WP generated thumb: manually add '-150x170' in the image URL of the featured image (eg. original > thumb image
Grab the latest 'themify' framework folder and put it in your localhost demo site (so you are testing with the latest framework)
In your localhost WP folder: drop in the new layout zip (eg. the portfolio-2.zip exported previously) in 'themify > themify-builder > includes > data' folder
Then drop in the screenshot jpg (eg. thumb-portfolio-2.jpg) in 'themify > themify-builder > includes > data' folder
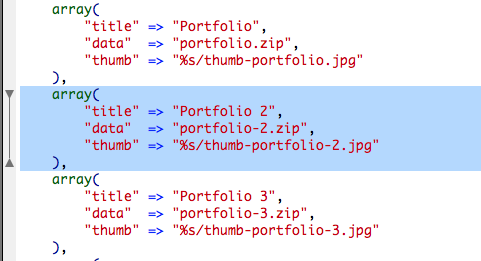
Then open 'layouts.php' file from the data folder and add a new array of the new layout in alphabet order (see screenshot)
After you added the array in the layouts.php file, add a new test page on your localhost WP site, then try to load the new layout you added
If it imports the layout correctly, then move on to the next step to commit
Step 4: Commit Layouts
Launch GitHub desktop app, synce "themes" repository (remember to sync before adding files)
Part 1: Themify Framework: Replace the entire 'data' folder to Github repo 'themify > themify-builder > includes > data' (this is for the Builder in framework)
Part 2: Builder Plugin: Then replace the same 'data' folder to Github repo 'themify-builder > includes > data' (this is for the Builder plugin, so the framework and Builder plugin both have the same Builder Layouts)
Verify the changes (make sure you are committing the right files and folders)
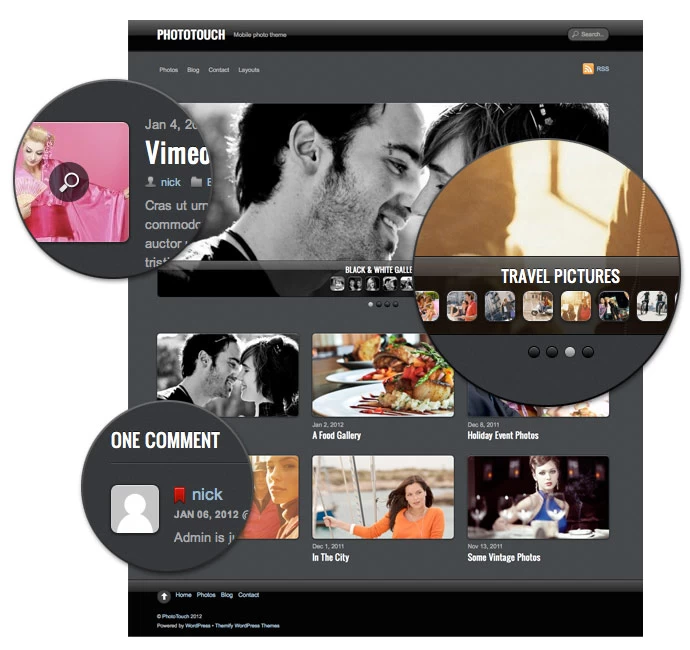
Hope you had a fantastic holidays and that you've taken a lot of photos over the holidays because we have a new responsive photo theme for you - PhotoTouch. It is a beautiful photo theme designed with mobile devices in mind. It features a gallery/slideshow that mimics the iPhone native Photos app. User can swipe or press arrow keys to go through the photos, double tap, auto play, pinch and expand, etc. Combined with the responsive design and slider, PhotoTouch is the perfect theme to showcase your photo portfolios. Most importantly, it works on both desktop and mobile devices such as iPhone, iPad, Blackberry, and Android phones (view demo).
We are offering 30% disount code for this new theme. Use the coupon code "phototouch" for a 30% discount off this theme until Jan 12, 2012.
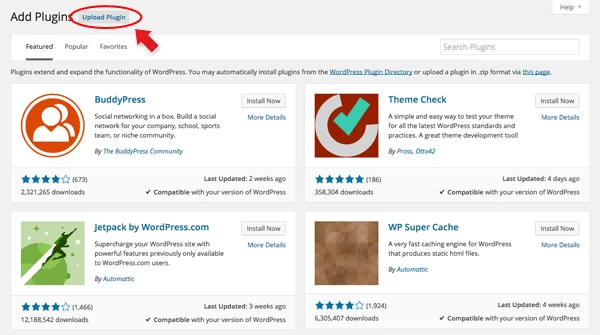
Installing Builder Addons is exactly the same as installing WordPress plugins.
To install the addon:
Firstly, download the addon zip file from the link provided in your Themify Member Area.
NOTE: some browsers (eg. Safari) auto extract zip files automatically. Right-click on the download link and select "Save Linked File As" and it will allow you to download as a zip file.
Login to your site's admin area.
Navigate to WP Admin > Plugins > Add New.
Now, click the "Upload Plugin" link.
Select "Browse" and navigate to the plugin zip file which you downloaded in the first step and then select the "Install Now" button.
This will initiate the plugin installation process, and once finished, you can then activate the plugin.
Importing the addon demo layout
Each addon zip file contains a sample Builder data file which you can import to your site. It helps you to understand how the addon demo is created.
To import the addon demo data:
First, extract addon zip file to your local computer
You should have a folder of the addon. Inside there is a folder named "sample", and inside that folder there is a Builder data file in a zip format (eg. "addon_name_sample-builder-layout.zip").
To import the Builder layout, login to admin and then go to the page frontend where you want to import the Builder layout. From the top admin bar > select Themify Builder > Import / Export > Import, upload the sample zip file.
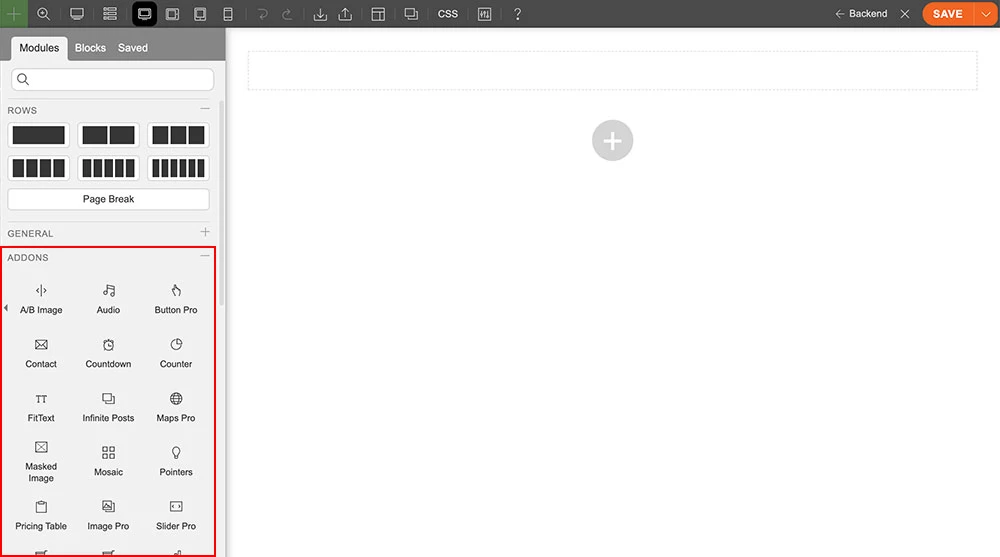
Using the Mosaic Addon
Once the Mosaic addon is installed, you will find the Mosaic addon module in the Themify module panel. The module is available in both the backend and frontend edit mode (just like all standard modules).
In the backend: you can find the Mosaic module in the Themify Custom Panel.
On the frontend: you can see the modules after turning on the Builder in the top admin bar > Themify Builder > Turn On Builder.
Drag and drop a Mosaic module in a row.
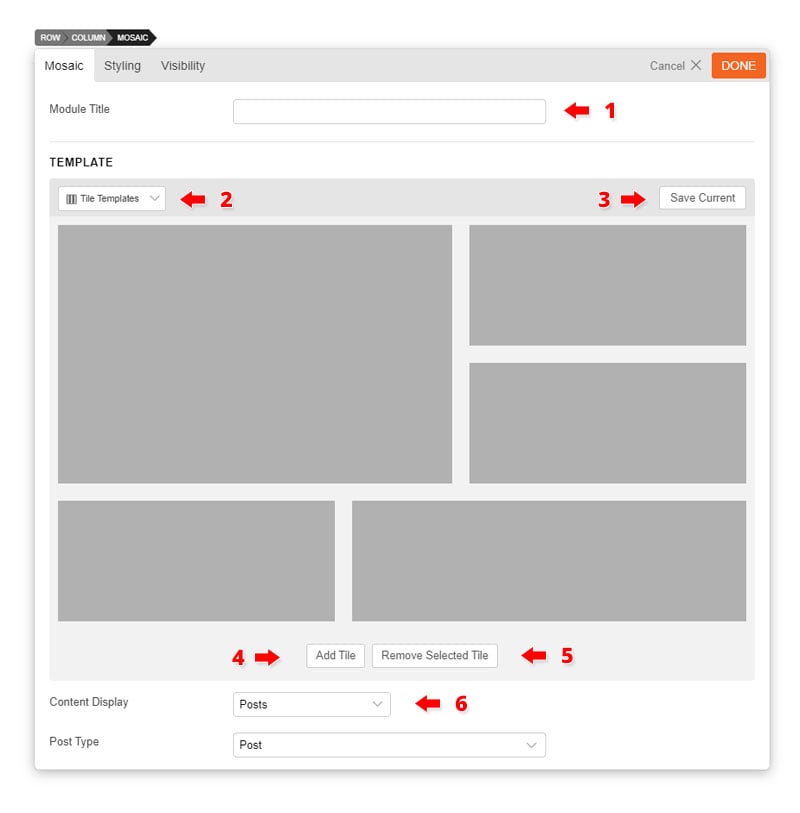
Mosaic Options:
1) Module Title = (Optional) Insert the module title that will appear at the top of the module.
2) Tile Templates = You can load pre-made and saved tile templates using this dropdown.
3) Save Current = Save your current tile template so you can load it onto another Mosaic module or reuse it next time.
4) Add Tile = On the tile template area, you can click and resize each tile on the template to create a custom mosaic layout. Click 'Add Tile' to add another tile onto the template.
5) Removed Selected Tile = To remove a tile, first select the tile on the template, then click 'Remove Selected Tile'.
6) Display = Select the content type to display. Once a content type is selected, it will show the options related to the type you've selected.
Posts = Display default WordPress posts.
Text = Display static text and images.
Gallery = Display an image gallery from your WordPress media library.
WooCommerce Products = Display products from the WooCommerce plugin.
Post Type Builder = Display custom post types created with the Post Type Builder plugin.
Themify Event Posts = Display event posts from the Themify Event Post plugin.
NextGen Gallery = Display galleries created by the NextGen Gallery plugin.
RSS Feeds = Display posts from RSS feeds.
Directory Listing = Auto display files from a given folder on your site (ie. you can upload a bunch of image files in a folder and it will auto load all images onto the mosaic layout). It auto recognizes image and mp3 files and apply special layout to it. The image files will show a thumbnail and mp3 files will have an audio player (the album info are pulled from the mp3's ID3 tag).
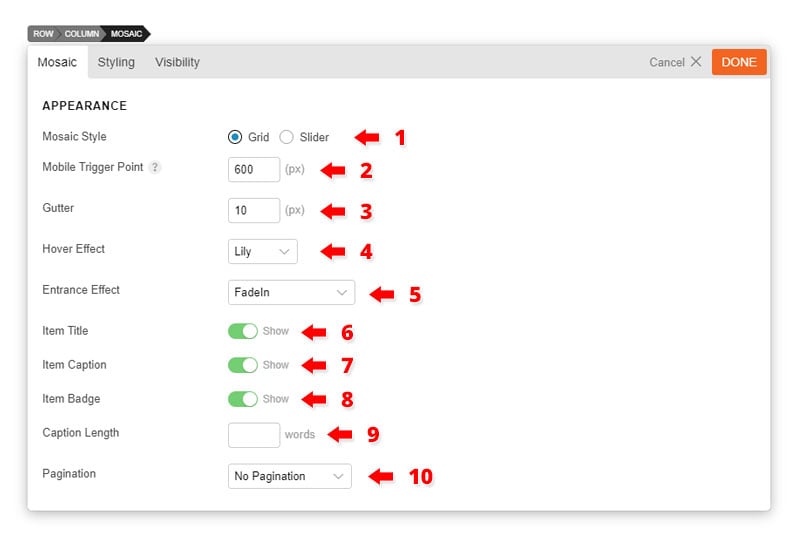
Mosaic Appearance Options:
1) Mosaic Style = Displays mosaic in grid or slider style.
2) Mobile Trigger Point = Enter the breakpoint to switch your mosaic to mobile layout (all tiles will display as fullwidth stacking).
3) Gutter = This is the spacing between each tile.
4) Hover Effect = Choose between a variety of effects that display when hovered over a tile.
5) Entrance Effect = By default, all tiles are hidden until they are fully loaded. When loading is done, the entrance effect will animate.
6)Item Title = Choose to display or hide item title.
7)Item Caption = Choose to display or hide item caption.
8)Item Badge = Choose to display or hide item badge.
9)Caption Length = set how many words you want to display.
10) Pagination = By default, Mosaic will query the posts/content as per the number of tiles you have on the template. If there are more posts then the number of tiles on the template, it will appear on page 2, 3, etc. Below are the pagination options.
No Pagination = It will not show any pagination.
Infinite Scroll = It will load more posts when user scrolls down to the footer.
Pagination Links = It will show the number pagination.
Load More Button = It will load more posts when Load More button is clicked.
A tutorial video series has been in the works for some time, and after honing and tweaking our Builder (as well as our video editing abilities), we are excited to introduce you to them!
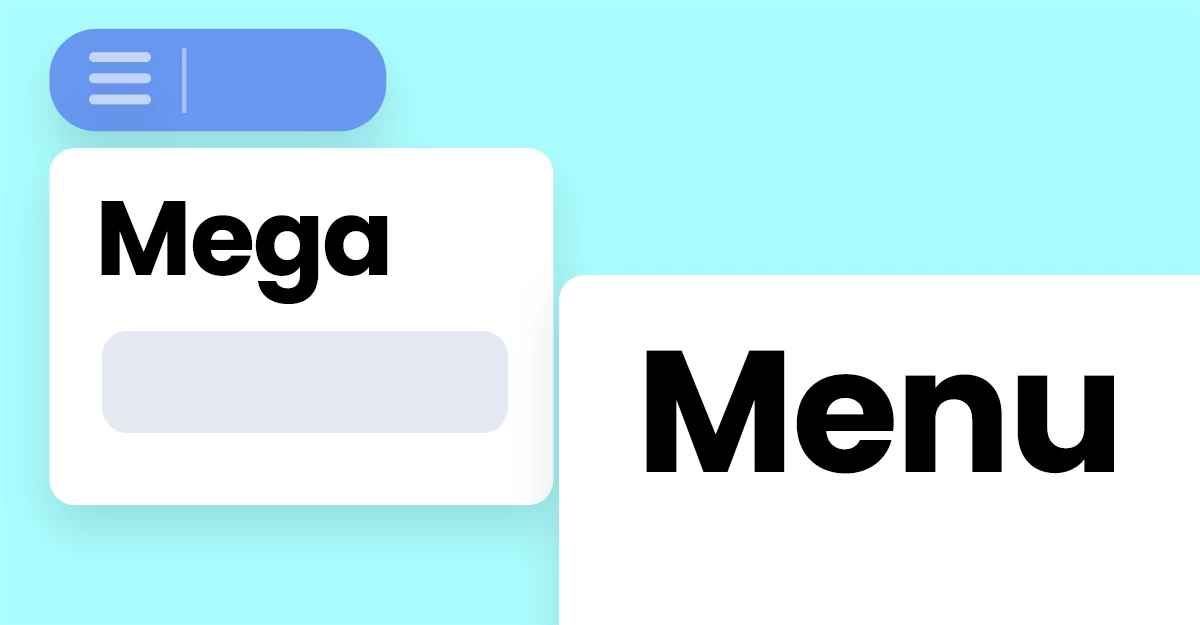
Hello, mega menu lovers. We are thrilled to bring you some exciting news. The beloved mega menu, previously limited to selective themes like Ultra and Shoppe, has now been seamlessly integrated with our Builder. The new mega menu feature has been designed for effortless usability and functionality. It uses the core WordPress menu admin to configure the mega menu, eliminating the need to start from scratch. Furthermore, this integration ensures backward compatibility—should you choose to disable the mega menu in the future, your existing menus remain intact.
Our mega menu isn't just versatile; it's also impeccably responsive on both desktop and mobile devices. This means that regardless of how your audience views your website, the mega menu will adapt seamlessly to provide a consistent, user-friendly experience.
For those managing extensive websites with an abundance of pages and links, the mega menu proves to be a handy tool. It allows you to showcase multi-column dropdowns that can feature links, textual content, or even widgets. Imagine presenting featured posts, WooCommerce products, and more, all neatly organized within the mega menu's expansive layout. Now that the mega menu has been incorporated into the Builder, you can use Builder Pro to start creating header templates with mega menus.